
However, eventually the PC Speaker began to shrink in size and eventually give way to the tiny piezoelectric tweeters that are just too quiet to do justice to any kind of complicated audio. (You can blame IBM for putting the idea into other manufacturer's heads because the IBM PCjr., released in 1983, used a piezo tweeter for the PC Speaker.)
When emulators like DOSBox became mature, they could easily output basic PC Speaker audio. Basic PC Speaker audio is essentially a square wave with a fixed volume level and a 16-but frequency selector. They can have difficulty with the more complex sounds produced by Pulse Width Modulation, which essentially sends changes to the frequency of the square wave to the speaker faster than the speaker cone's driving circuitry was intended to handle. This requires a much more rigorous emulation of the CPU, the timer and the "analog" characteristics of the audio generation.
My friend Trixter wrote up a long time ago a guide to record the PC Speaker sound. It remains the quintessential guide to the topic : http://www.oldskool.org/guides/speakerrecording Read it and come back here if you are totally unfamiliar with the issues involved in recording the PC Speaker.
The easiest overall way to record actual PC Speaker sound is to use a Sound Blaster card, Pro-AWE64, which always has a 2-pin input header for the PC Speaker. While earlier computers like the IBM PCjr., Tandy 1000s, and the AT&T 6300 have audio output jacks that can output PC Speaker audio, they are limited in terms of their upgradeability. Also, many games like King's Quest and Maniac Mansion will not output PC Speaker audio if they detect a Tandy 1000. Still, when it works, it does a very good job :
(Note the screech sound, DOSBox does not do it justice.)
Laptops also usually have a headphone jack, but they typically did not have sound cards built in until the Pentium era. Finally, some sound cards like the Pro Audio Spectrum line have hardware that can recreate the PC Speaker. But a Sound Blaster Pro can be used in any PC with an ISA slot, even the Model 5150.
For some strange reason, while most PC motherboards have 4-pin headers for the PC Speaker, the Sound Blaster cards only have a 2-pin header. Essentially you need to modify a 4-pin cable, I typically use the CD-ROM audio cables with the black connector. Here are the pinouts for the PC Speaker motherboard header and the Sound Blaster header :
Motherboard
1 - Speaker Data
2 - No pin/Key
3 - Ground
4 - +5v
Sound Blaster
1 - +5v
2 - Speaker Data
But the the output from the Sound Blaster is oddly filtered, giving it an annoying quality which the real cone-driven sound lacks :
I decided to try the easiest solution given by friend Trixter. This will provide a recordable and volume controlled output from the PC Speaker. You need a cable with two alligator clips on one end of the cable and an audio connector on the other end. I took a mono mini-jack audio cable and cut one of the ends off and stripped the wire. The ground wire surrounds the plastic in which the signal wire is encased. You solder one alligator clip to the signal wire and the other alligator clip to the ground wires. I pulled the ground wires to the side and rolled them together to give myself enough surface area to solder.
On the mini-jack, the "tip" carries the signal and the "sleeve" is the ground. Attach the "tip" alligator clip to the exposed metal wire or solder of the PC Speaker cone. The "sleeve" alligator clip is attached to any metal portion of the PC's enclosure.
You will notice that the PC Speaker is connected only by pins 1 and 4 on the motherboard header. You want to connect your alligator clip to the wire corresponding to pin 1, the data pin. Pin 4 is the data pin. Alternatively, you can remove the PC Speaker from the header and clip the pins correctly. Pin 3 is ground, so you can adapt a MPC2 CD-ROM audio cable very easily.
Of course, when I decided I wanted to finally make a cable, I could only find one alligator clip! I had to improvise for the second clip with a full metal binder clip I had in my desk drawer. The black clips are painted with a non-conductive paint, so they really do not work. Here is my cable :
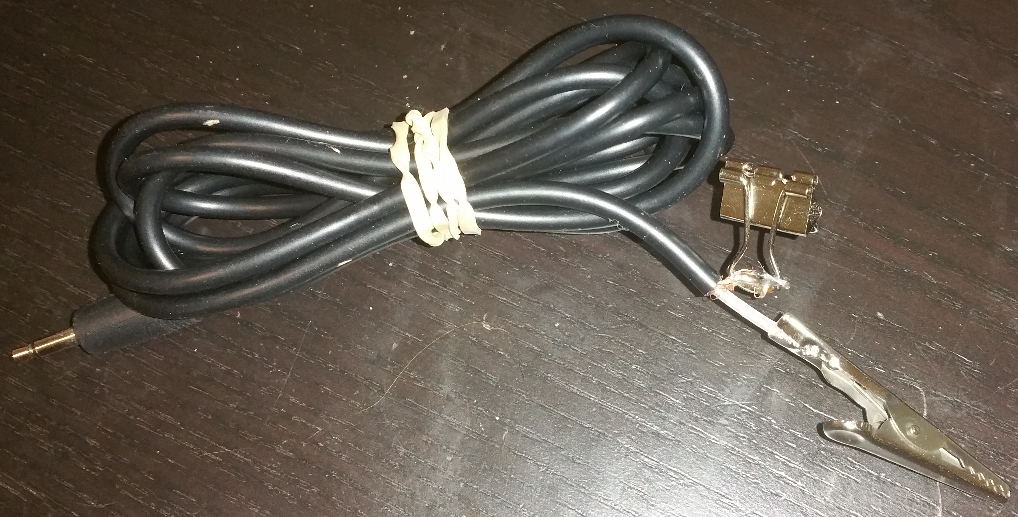 |
| It works better than it looks |
However, the beginning level sound is accurate, DOSBox is not.
For samples, I have chosen a selection of music from the least technically complex to the most technically complex. I recorded the programs running on my IBM PC/XT. King's Quest and Maniac Mansion are very simple, while Digger and the MOD track from the 8088MPH demo use PWM. Note how Digger interleaves the simple sound effects with the more complex music, pretty amazing really when the game is still playable. The MOD player from the 8088 demo requires almost all the 4.77MHz 8088 CPU's time, only scrolling 40-column text is being done while the song is playing.
No comments:
Post a Comment